Posts

Showing posts from October, 2017

Project #10: MORPHX

This project was all about creating a smooth transition from childhood to now. We selected two pictures, one from a younger age and one from a recent time, lining them up and cropping them to match up the faces for the short animation. Using the timeline feature on PhotoShop, we added the pictures, added a crossfade transition, and watched ourselves "grow up."

Project #9: ART PROJECT

Image
This project introduced us to even more PhotoShop tools as we utilized the pen tool, image adjustment features, and the eraser tool. We used these tools to trace a picture of our own face, inserting it onto a famous photograph or painting, and blending it to make it look as seamless as possible.  My image shows my face on a Frida Kahlo portrait. I tried my best to distort the face into the same angle as the portraits, and adjusting the coloring to make it much more yellow-toned than the original picture.

Project #8: SOMEWHERE

Image
This project helped us get accustomed to the pen tool in PhotoShop, which is surprisingly much more difficult for me to get the hang of than the pen tool in Adobe Illustrator. We had to use this pen tool to cut out a full body picture of ourselves, or in my case, me and my friend. We had to insert ourselves into a background in such a way that makes it look as normal as possible. I inserted my picture into the background, adjusting the lighting and adding shadows and highlights to make it as look as real as possible.

Project #7: AUTOSCOPY

Image
This was a fun experimental project in which we got to edit photographs in whatever way our hearts desired in order to get used to and learn about the PhotoShop editing tools. We did simple edits such as adjusting the color hues, saturation, and brightness. We also played with the filter gallery. Some photos ended up looking more like illustrations, but each and every one was unique, using different settings and adjustments in PhotoShop.

Project #6: POSTER

Image
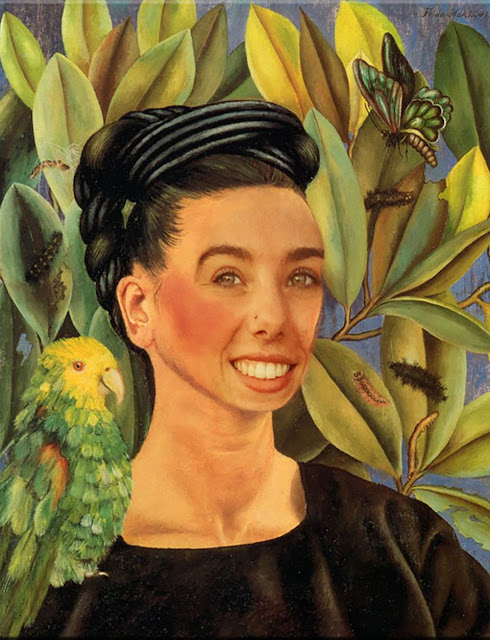
This was our last project in Adobe Illustrator, tying together all of the tools we have utilized thus far, especially the pen and gradient tools, along with the eyedropper, text, move, and a few others. The assignment was to recreate a vector poster, working in small sections to recreate as much detail as possible. I had to work with the specific order of layers to make everything fit together without the white background showing through the final image. Using the eyedropper to get the exact colors from the poster I recreated, I pieced everything together, making the final image a duplicate of the poster itself while excluding some of the smaller details in the piece. My focus was the face and head rather than the body, wanting to make the hairs and ears look accurately duplicated to show that I can properly use the pen tool. My last step was to use the text tool, picking out fonts as close to those used on the original as possible in order to put the title up top. 

Project #5: GRADIENT MESH

Image
The premise of this project was to recreate a fruit or vegetable of our choice on Adobe Illustrator, recreating the colors and texture in a way that makes it as realistic as possible. I chose to recreate a mango, creating gradients from pinks to yellows to deep reads to greens. The spots of white light from the light were the hardest parts to recreate, blurring them out in a way that make it look natural. The stem was created the same way, with less blur effect, utilizing the pen and eyedropper tools. The texture of tiny dots overtop of the fruit we created made it look as realistic as possible, the final step in creating our fruits.